Table of Contents
Flextory Getting Started Guide
Getting Your Account
You can create a free Flextory Beta account at https://mcp.flextory.com/accountCreation/newBetaAccount.php. Once you create your account and verify your e-mail, you can log into it by going to accountName.flextory.com, where 'accountName' is the account name you choose when you signed up. After that, login by clicking 'Login' in the upper right hand corner.
Flextory Terminology & Concepts
Before you get started, there are a few basic terms and concepts you should know to best make use of Flextory.
Item Types
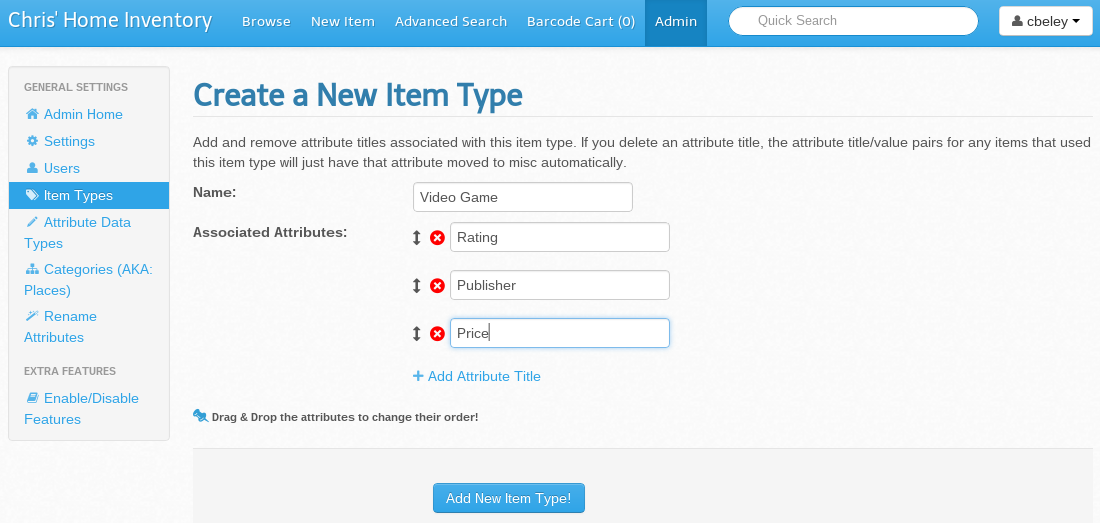
Item Types are used to describe the type of item you are trying to add to your inventory. For example, if you want to add a book to your inventory, you'll probably want to create a Book Item Type. Item Types can also have any associated attributes that you want. So, for your Book item type, you may add attributes such as 'Author', 'Publisher', 'Pages', etc.
Attribute Types
Attribute Types can be used to describe the type of data that can be in a particular attribute. For example, you may wish to restrict any attribute called 'Cost' to be a number or any attribute called 'Purchase Date' to be a date. By default, attributes are not restricted in what can be in them.
Categories
Categories in Flextory can be used however you like; however, they make the most sense when used to describe Locations. For example, you may create a category for each room in your house. To take full advantage of Flextory, try to use Item Types when you want to categorize types of items and use Categories when you want to organize inventory by location or something that Item Types doesn't make sense for.
Links
Flextory allows you to link any item to any other item. Links are useful if you have items that are directly related to each other, such as a computer and its associate peripherals. You can combine Item Types, Categories, and Links together to create complex organization and association of items.
Active/Inactive Items (Advanced Feature)
Items can be marked as inactive so that they do not show up with your normal inventory. This is useful if you are adding items to your inventory that you currently do not have. For example, you can create an inactive item for an item that is coming soon. The item will be marked as active automatically whenever you save it.
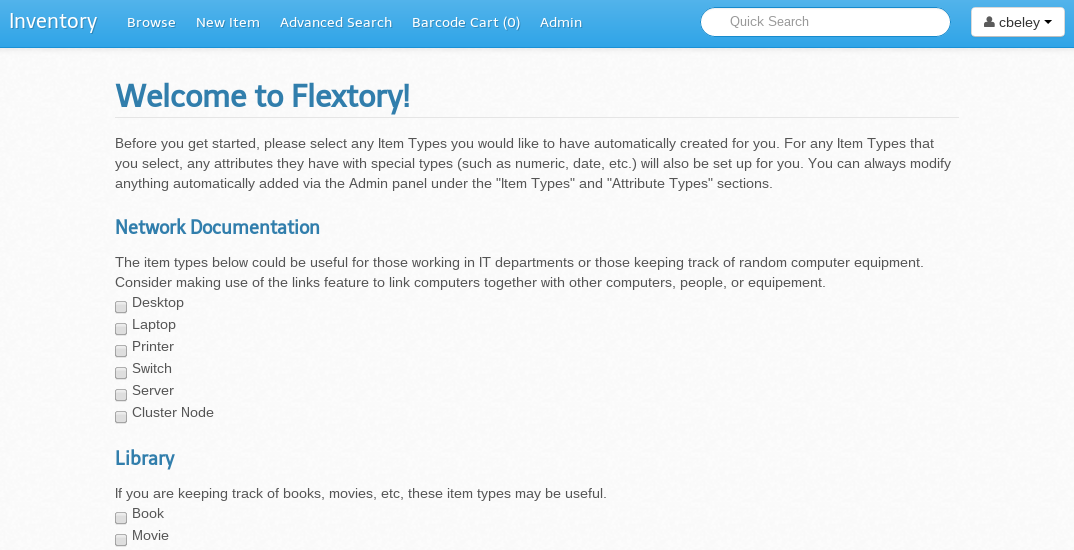
First Time Logging In
The first time you log in you'll be presented with the option to automatically import certain Item Types. Pick any that you think would be useful. You can always remove or edit them (and their associated attributes) later on.
Personalizing Your Flextory Account
Configuring Flextory
Click Admin, then Settings.
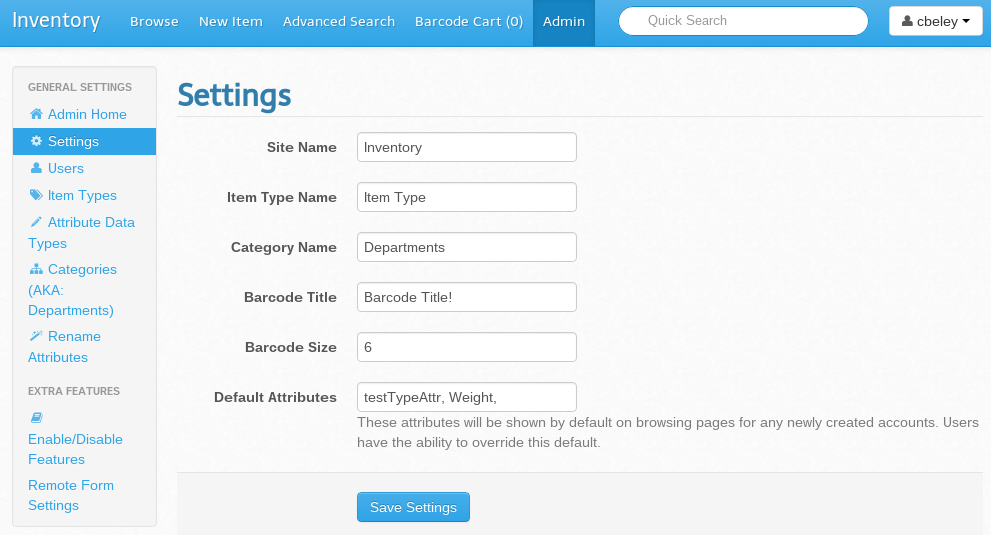
- Site Name: The name that appears at the top of your inventory.
- Item Type Name: If you want to call Item Types something else, you can do that here. For example, you may wish to call them 'Asset Types' instead.
- Category Name: You can also change the category name. Examples: 'Flextory Offices', 'School System', 'Company Subdivision Name', etc.
- Barcode Title: This will appear at the top of barcodes and will be included when you export your barcodes for use with a barcode printer.
- Barcode Size: You can change the length of barcodes that Flextory generates for you. Barcodes will always be prefixed with 0's to make them the configured size.
- NOTE: If a barcode is greater than the 'Barcode Size' setting, it will NOT be truncated.
- Default Attributes: You can set what attributes newly created users will see when they first log into their Flextory account. Individual users can always change what attributes they see by making use of Table Views.
Add/Edit Item Types
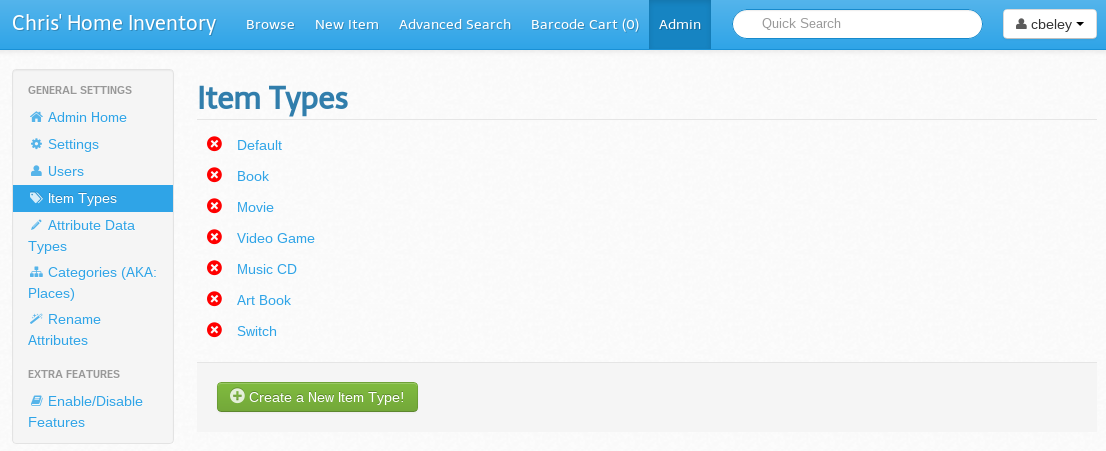
From the Admin Panel, click 'Item Types' and then click 'Create a New Item Type!'. You can also edit existing Item Types by clicking them or delete item types by clicking the red 'X' by them. If you delete item types, any items that were assigned that Item Type will be reassigned to the 'Default' Item Type.
Add/Edit Categories
From the Admin Panel, click 'Categories'.
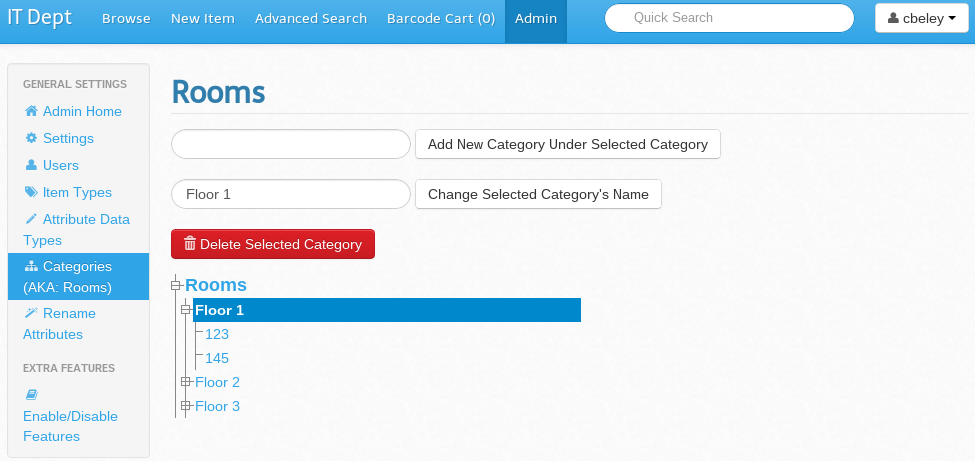 You can interactively explore all of your categories by clicking a category name to expand and select it. If you want to create a new category, click on the category you want to be its parent, fill in the new category's name in the 'Add New Category' field, and then click 'Add New Category Under Selected Category'. You can also change the selected category's name or delete it. If you delete a category, all its sub-categories will also be deleted and any items in those categories will be moved to the top-most category.
Add/Edit Attribute Data Types
From the Admin Panel, click 'Attribute Types'.
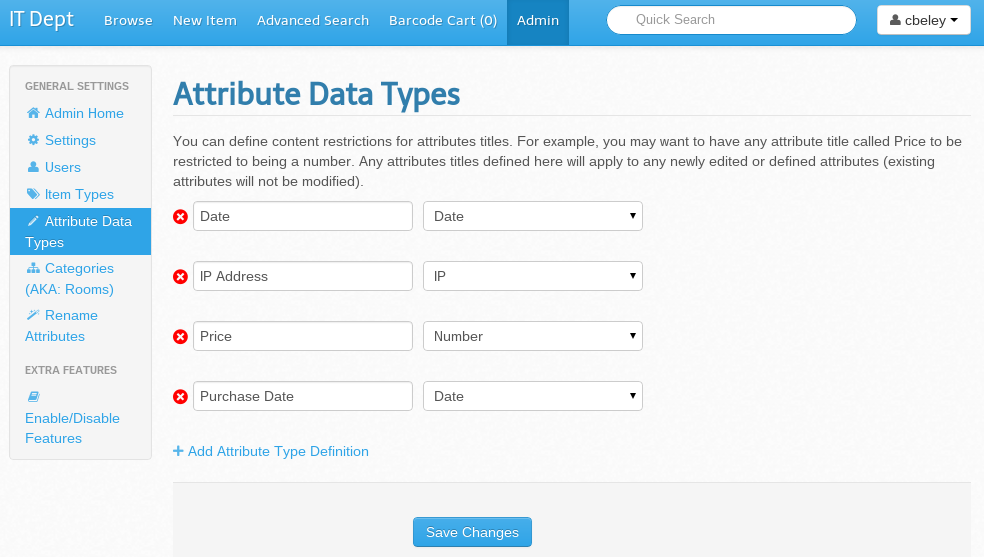 Click 'Add More Attribute Type Definitions' to define more attribute types. Then select between Number, Integer, Email, Date, or IP as the attribute type for each attribute listed.
Creating Your First Item
Click 'New Item' at the top of any page

- Category Selection: You can interactively browse available categories using the 'New Category Selector'. The last category you click on will be the category the item is put in.
- Copies: You can create multiple identical items in one go. The items will all have the same properties and values, but will all have unique barcodes and ids.
- Barcode Prefix: The barcode for the item will be prefixed with whatever value you put here. This is mainly useful for when you use the 'Copies' feature.
- Barcode: The barcode can be whatever you want as long as it is unique to your inventory. If you leave this field blank, a unique barcode will be generated for you automatically.
- Item Type: Use this drop down to select the item's type. When you select an item's type, it's corresponding attributes will automatically appear.
- Misc. Attributes: Click 'Add Attributes' to add extra attributes to an item that aren't part of the Item Type for the item. This is useful if you need to add an extra note to an item or a piece of information that only applies to a few items of a particular item type.
Browsing Items
Click 'Browse' at the top of any page to browse the items in your inventory.
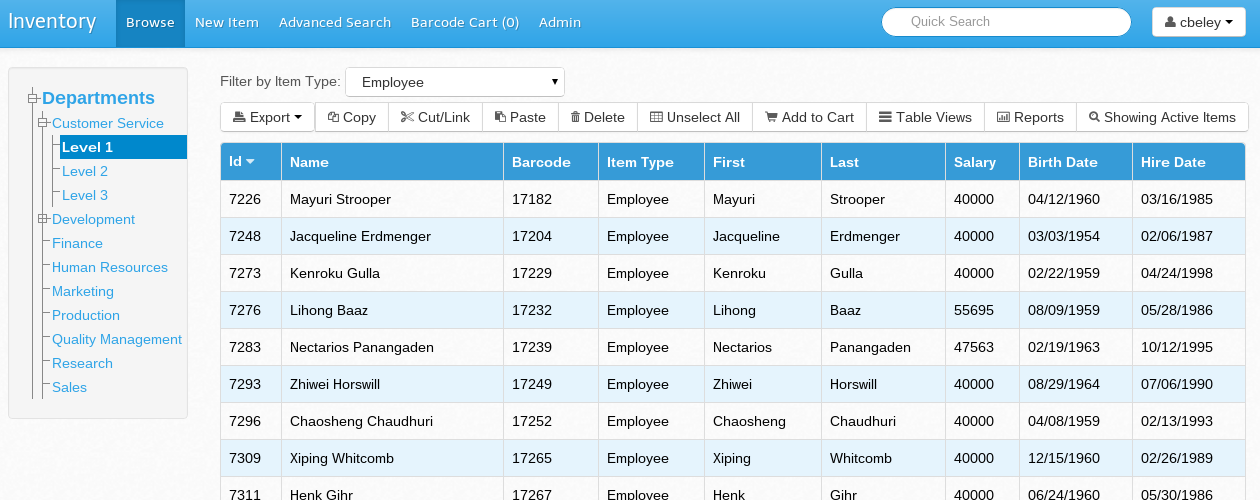 You can interactively browse your items by category by clicking categories on the left-hand side. You can also filter your items by Item Type by selecting an item type with the 'Filter by Item Type' drop-down. Finally items can be sorted by any attribute that you want by clicking on the attribute. If you click the attribute again, you can alternate between ascending and descending results.
Customize What Attributes you See While Browsing
You can customize the attributes you see while browsing items via the Table Views feature. While browsing items, click “Table Views” to customize what columns/attributes you see.
Custom Attributes
You can add any of your custom attributes as a column under the Custom Attributes tab. To add an attribute, you may select an Item Type from the drop down and then click the plus sign next to an attribute to add it as a column. You can also type the attribute you want to add as a column directly into the input box and then click “Add Attribute” to add the attribute. Suggestions for attributes will be shown as you type.
Once you add attributes, you may change their order by dragging and dropping them. You can also remove attributes as a column by clicking the red X.
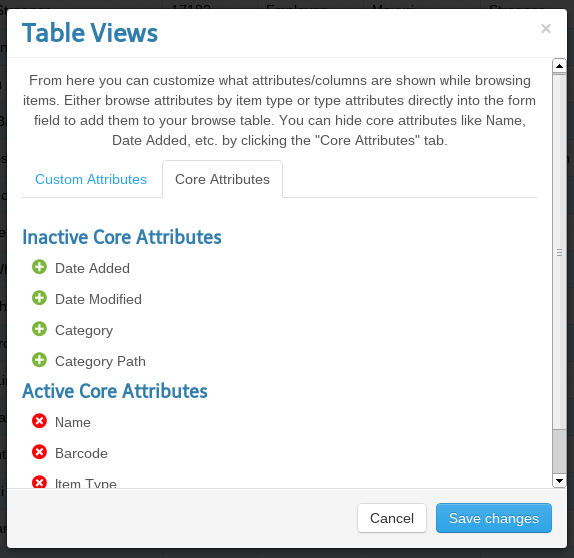
Core Attributes
The following core attributes that apply to every item in your Flextory account are as follows:
- Name
- Barcode
- Item Type
- Date Added
- Date Modified
- Category – primary category of the item. For example: Room 123
- Category Path – The full category path. For example: Rooms → Floor 1 → Room 123
You can add any of these core attributes as columns by clicking the green plus symbol or remove them as columns by clicking the red X's. You can also rearrange active core attributes by dragging and dropping them.

Saving Your Changes
Once you are done customizing what custom attributes and core attributes you want to see, press “Save Changes”. The new configuration of columns will automatically appear.
Item Manipulation
Selecting Items
Items can be selected on the browsing page by clicking any part of a row that is not a link. Multiple items can be selected by clicking each one individually. You can also select items in mass by selecting an item, then clicking another one while holding down the shift key (just like you would when working with files in your operating system's file explorer).
Selected Item Operations
You can make use of the toolbox buttons to do various things with your selected items.
- Copy: Create a new item with the same properties as the currently selected item. If multiple items are selected, only the first item will be selected. After clicking copy, you will be brought to the item editor to change anything that you like.
- Cut/Link: The selected items will go into your virtual clipboard. You can then paste these items into another category to move them in mass, or you can click “add cut items as links” when editing a item to add the items in your clip board as links to the item you are editing.
- Paste: Paste/move the items in your clip board to the category you are currently browsing.
- Delete: Permanently delete all selected items.
- Print: Generates a printable table of the selected items.
- Unselect All: Unselected selected items.
- Add to Cart: Add to your barcode cart so that you can generate barcodes for them.
- Showing Active Items/Showing Inactive Items: Pressing this will toggle between showing active and inactive items. When viewing inactive items, you will see inactive items EVERYWHERE (even when you search) and you will not see active items.
Barcodes
You can print out barcodes for any items that you added to your Barcode Cart by clicking “Barcode Cart”.
 To print our sheets of barcodes, select either “Code 128 Barcodes” or “QR Codes” on the right, and then click “Generate Barcodes”. A pdf of all the barcodes in your barcode cart will be generated, which you can then print out.
Printing Barcodes with a Barcode Printer
Select “CSV File” and then click “Generate Barcodes”. This will give you a csv file which can be imported into most barcode printer software suites. The csv file contains the Name, Barcode, and Item Type of each item that was in your barcode cart. If you need further help printing barcodes using your barcode printer, feel free to contact Flextory Support at support@flextory.com
Conclusion
Given the above, you are now familiar with Flextory's core features. Feel free to browse the Documentation to see what else you can do with Flextory and take a peek at the “Enable/Disable Features” page in your Admin Panel to see what else Flextory can offer you. If you need some help or are still a bit confused, feel free to e-mail us at support@flextory.com. Also, if there's something you think Flextory should be able to do that it doesn't already, please e-mail us at features@flextory.com.